The top (soundboard) wood has arrived as two bookmatched wedges of AAAA grade spruces ready to be joined and carved into a dish shape.

Before joining the common edge needs to be perfectly straight on both pieces. This is done with a shooting plane (Long base) and the process is called 'shooting the edge'.

Neck blank = maple, the back bookmatched halves = maple, and the two bookmatched side strips

Glueing bookmatched halves of the top together.

Roughly cutting out shape of top (and back) with electric jig-saw.

Cutting side blanks to required width

Sanding down edge roughly to thickness

Rough (bulk) sanding to approximate shape

21/01/2015 Checking progress of shaping with profile template

15/2/15 Shaping the outside of the top arch with a occillating button sander

15/2/15 Still some humps and hollows to be smoothed out but the shape is evolving

Progress is occurring on the 'recurve' around the edges.

9/3/15 Using home made callipers to measure thickness of the top.

9/3/15 Setting out the 'f' holes

Cutting out an 'f' hole using a coping saw

14/3/15 Sanding to hollow out the concave shape of the underside of the top. The 'f' holes are only roughly shaped

14/3/15 Rough inside shape of the top.

23/03/15 Shaping the 're-curve' channel around the edge with a curved finger plane and sandpaper. The re-curve will allow the dish shape to flex and vibrate easier.

Rubbing on carbon paper to identify the high spots. This process will achieve a good fit and join between the brace and the concave of the top.

Filing of the high spots identified with the carbon paper.

Notches in the braces to form a 'box' join.

Box join before gluing onto underside of the top.

Shaving the braces. During this process the top is tapped with the fingers till an acceptable tone is achieved.

Cutting out rough neck shape from blank. Note that his piece is only half the neck width as the final neck will comprise of two half widths and a center strip laminated together to guard against any warping.

Glueing the pieces that make up the neck together

Neck with side 'ears' attached to the head.
I have made a mistake here and done things out of order. I should of cut the truss rod slot down the centre of the neck first! Now I am going to have trouble getting the router guide fence past he ears. I do however think I have a way of getting around this.

Using a router to cut the truss rod slot

Completed truss rod slot

Using a rotary 'safety planner' to thin down the head stock

Notice how the left hand end of the head stock is raised on a small fillet. This produces a tapered head stock - thin at its end increasing in thickness towards the neck. This is mainly for asthetic purposes.

Hand cutting the neck to body tenon joint.

Roughly cut neck to body tenon joint

Roughly shaped neck with neck extension beyond heel now in place. Truss rod is shown yet to be installed.

Sides ready for bending

Inside of Back nearing completion

Outside surface of back nearing completion

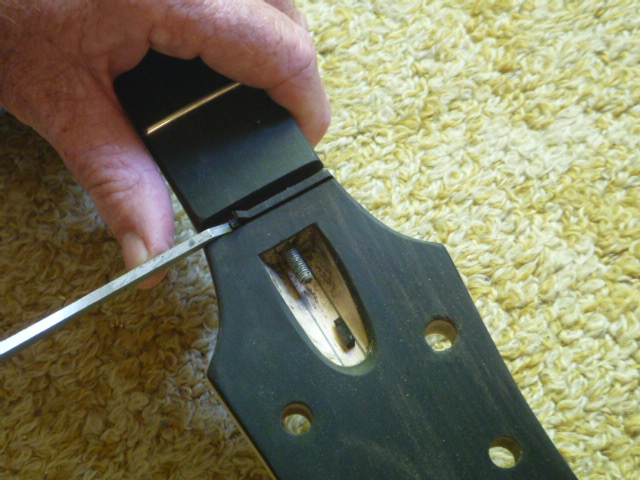
Excavation recess for truss rood adjustment nut

Anchor hole for truss rod

Truss rod a filler strip ready for installing

Installing truss rod with filler strip being glued on top.

Planing away the excess filler strip down to flush with neck surface.

Close up of truss rod adjustment nut in its recess with filler rod finished flush with neck surface

Sanding back of headstock and curve into neck.

Clamping the veneer to the underside of the head stock. The rubber jandel is being used to apply even pressure around the bend between neck and head joint.

Cutting out headstock shape

Top surface of headstock roughly cut out ready for final shaping


Sawing the fret slots

Using a square to use as a guide whilst cutting the fret slots

Tapered fingerboard ready for gluing onto neck


Loosely fitted sides being shaped in the mould.

Sides out of the mould with tail block and head/neck block ready for assembly

clamping the neck block in position whilst gluing

Neck about 50% shaped

Sides glued together out off the mold. Side bracing has also been glued in position.

Glueing on kerfing using pegs as clamps

Drilled top of headstock

Drilled underneath of headstock.

Using a flat sanding board to level of the kerfing and level the edge rim to a perfectly flat surface.

Image for headstock inlay. Reduced 40% nfrom a picture in a book I have.

Image positioned on headstock ready for excavating the cavity

Glueing on top to sides using spool clamps

Close up of glued top untrimmed

Trimmed glued top yet to have binding applied

Wiring in electric, pickup jack

Clamping on back whilst glueing to sides

Fine scraping of the re-curve on the back. Graduating the thickness using this method affects the flexibility of the surface which effects the tone of the finished guitar.

Routering out the neck tenon joint in the body

Drilling holes in edge of fingerboard for fret side dots

Hammering in side dots

Dremmel routering tool with guide attached to router the perfling and binding steps


Glueing the perfling into place


Inner wood strip (perfling) glued in place

Binding now in place alongside perfling ready for sanding.

The next four photos show the body with binding and perfling installed. The body has had preliminary sanding with 80 grit sandpaper. It will eventually be finished sanded down to 400 - 600 grit sandpaper.
Top = Spruce

Back = Figured Maple


Scibing the outline of the headstock picture for the inlay. To provide an outline for routing.

Chalking in the scribing to highlight the outline.

Rough outline with chalk highlighting the scribing cuts.

Cavity routed out ready to receive inlay

Jig for bending the lengths of fret wire


Sanding under bright lighting to accentuate the contour shadows to ensure fair even symetrical curves

Sawing the Paua shell for the headstock inlay

Gluing the neck to the body

Gluing heel cap into position

Sanding jig used to steady the bridge whilst it is moved back and forward over sandpaper place on the top. This ensures the footprint of the bridge perfectly matches the complex curvature of the top for optimum transmission of vibration..

Chiselling out the slot for the nut

Just finished the coating process at 'Binford Luthiers", waiting for me to pick it up. It then be left a few weeks for coating to cure before it is levelled of with wet&dry and then cut and polished..Can't wait!

This post will be updated as work on this guitar continues.
Its really interesting to see all these steps. What great patience you must have. Definitely looks like a tricky, but very well done process.
ReplyDelete